ISO Images
How to mount/Attach ISO images?
Mounting an ISO Image will attach it to the virtual drive in your server.
Rebooting your server while a ISO image is mounted will cause it to boot from the image. After rebooting the server you can access our web console to complete the installation. Some images may require you to press a key in the console during boot, otherwise the server will boot from disk again.
To mount/attach an ISO image:
1- Login to Client Portal
2- Navigate to my services, in this case it is your VPS server.
3- Click manage services located at bottom right:

4- Scroll down to server quick actions and click iso images:

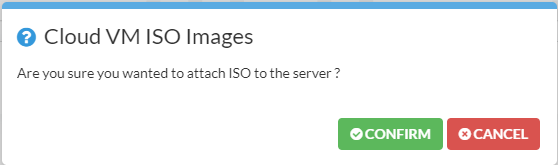
5- A message will appear – click confirm:
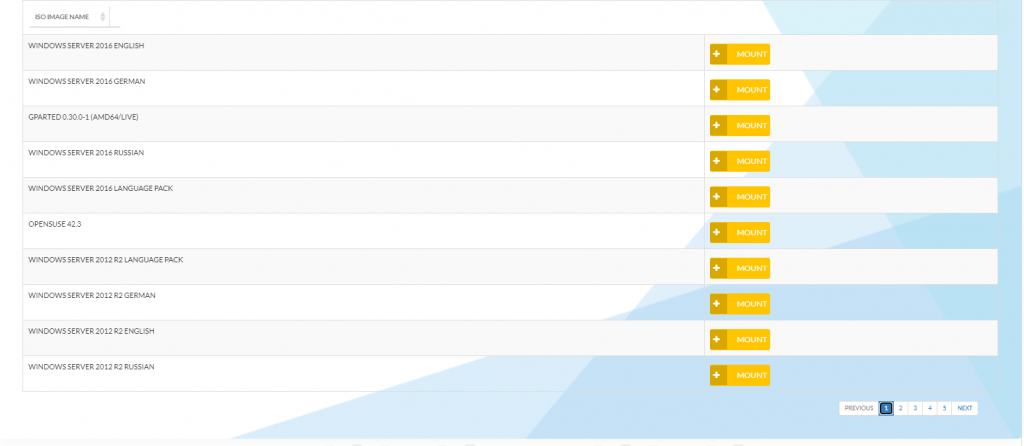
6- Select the desired ISO image to mount from list:
What are the OS ISO images available?
Mounting an ISO Image will attach it to the virtual drive in your server. Rebooting your server while a ISO image is mounted will cause it to boot from the image. After rebooting the server you can access web console to complete the installation. Some images may require you to press a key in the console during boot, otherwise the server will boot from disk again.
We Provide the following ISO Images:
- Alpine Virtual 3.13.1 (amd64)
- Archlinux 2020.06.01 (amd64)
- CentOS 7.9 (amd64/netinstall)
- CentOS 8.2 (amd64/netinstall)
- Clonezilla 2.7.0
- Debian 9.13 (amd64/netinstall)
- Debian 10.6 (amd64/netinstall)
- Fedora CoreOS 32.20201104.3.0
- FreeBSD 11.4 (amd64/netinstall)
- FreeBSD 12.1 (amd64/netinstall)
- FreeBSD 12.2 (amd64/netinstall)
- FreePBX 2002 (amd64)
- GParted 0.30.0-1 (amd64/live)
- Grml 2018.12 (amd64)
- IPFire 2.23 (amd64)
- k3OS v0.11.0 (amd64)
- Kali Linux 2020.1b installer (amd64)
- Mikrotik 6.45.9
- NetBSD 9.1 (amd64)
- NixOS 20.09 (amd64/minimal)
- OpenBSD 6.8
- OpenSUSE 15.2
- OpenSUSE 42.3
- OPNsense 20.7 (amd64)
- pfsense CE 2.4.5 (amd64)
- pfSense CE 2.5.0 (amd64)
- Proxmox Mail Gateway 6.2 ISO Installer
- Proxmox VE 6.2 ISO Installer
- RancherOS 1.5.6
- Slackware 14.2
- SystemRescueCD (2018-04-02)
- Ubuntu 18.04.4 (amd64)
- Ubuntu 20.04.1 (amd64)
- virtio-win-0.1.185
- VyOS 1.4 (amd64)
- Windows Server 2012 R2 English
- Windows Server 2012 R2 German
- Windows Server 2012 R2 Language Pack
- Windows Server 2012 R2 Russian
- Windows Server 2016 English
- Windows Server 2016 German
- Windows Server 2016 Language Pack
- Windows Server 2016 Russian
- Windows Server 2019 English
- Windows Server 2019 German
- Windows Server 2019 Russian
How are your images set up?
The images we provide use cloud-init to set up networking and other options.
They come with qemu-guest agent preinstalled. It is used for:
- Force flushing of disk caches before backups are created
- Resetting the root password upon your request
If you do not want to have qemu guest agent running, feel free to uninstall it. However, you will lose the functionality mentioned above.
Cloud-ISO Installation – Configure Gateway
Doing a manual installation via ISO will cause some trouble with the automatic configuration via DHCP. It is not possible to do a manual configuration via an installer.
Installation:
If you’re using Ubuntu 16.04 (or newer) or Debian 9 (or newer), the interface name is ens3.
To switch into a console, you’ll have to press ALT + Right arrow.
$ ip address
$ ip route add 172.31.1.1 dev ens3
$ ip route add default via 172.31.1.1
When the commands are executed, you can switch back to the installation with ALT + Left arrow.
After the Installation
Ubuntu 18.04 and newer
Ubuntu 18.04 uses netplan, which is different to the older configurations of Ubuntu. Edit the .yml file in the folder /etc/netplan/ :
network:
   version: 2
   renderer: networkd
   ethernets:
     ens3:
       addresses:
         - ::1/64
       dhcp4: true
       gateway6: fe80::1
Ubuntu 16.04 / Debian 9 or newer
Edit /etc/network/interfaces
auto ens3
iface ens3 inet dhcp
iface ens3 inet6 static
    address {{ IPv6 Adresse des Servers }}
    netmask 64
    gateway fe80::1
What does it mean if an image is marked as deprecated?
When creating a Server, you can select from a list of pre-made operating system images, such as Debian Version 10. When the end of the lifecycle of this specific image version comes closer, we will mark it as deprecated. This means that the image is still available. However, we will remove it in the future. We will keep images marked as deprecated for at least another 3 months after the deprecation date. After that period, they may become unavailable at any time.
For your Debian and Centos images – What is the minor version?
We automatically update our images to be the latest minor version within two weeks after the release. That means that our existing Debian 9 image will always contain the latest Debian 9.X version within two weeks after its release.
More detail::
For Debian and Centos, the versioning scheme is MAJOR.MINOR, e.g. Debian 9.1 is Debian with major version 9 and minor version 1.
For both Debian and Centos, updating a minor version (e.g. Debian 9.3 -> 9.4) is done implicitly when updating your software packages. Therefore the minor version will change during the lifetime of your server. To avoid confusion, our image descriptions do not contain the minor version, only the major one (e.g. “Debian 9” instead of “Debian 9.1”).