Networking
What are floating IPs and how do they work?
In Networking, Each Cloud server automatically comes with one IPv4 and one IPv6 net (/64). You can also add floating IPs for a small fee.
Floating IPs help you to create highly flexible setups. You can assign a floating IP to any server. The server can then use this IP. You can reassign it to a different server at any time, or you can choose to un-assign the floating IP from servers all together.
You can use floating IPs globally. This means you can assign a floating IP to a server in one location and later reassign it to a server in a different location. For optimal routing and latency, you should use floating IPs in the location where you create them.
For floating IPs to work, you must configure them inside the operating system of the server you use.
To temporarily configure a floating IPv4 “1.2.3.4”, you can run
ip addr add 1.2.3.4/32 dev eth0
Please note that this configuration will not survive a reboot.
To configure the first IPv6 address of floating IPv6 netblock 2a01:4f8:2c17:2c::/64, you should run:
ip addr add 2a01:4f8:2c17:2c::1/128 dev eth0
How to permanently configure a floating IP?
If you are using more than one floating IP, then the number on the interface (eth0:1) will be increased (example eth0:2).
On Debian based distributions (Ubuntu versions before 20.04, Debian):
- Access the server via SSH.
- Create the configuration file and open an editor:
touch /etc/network/interfaces.d/60-my-floating-ip.cfg
nano /etc/network/interfaces.d/60-my-floating-ip.cfg
- Paste the following configuration into the editor and replace your.Float.ing.IP with your floating IP:
IPv4:
auto eth0:1

iface eth0:1 inet static

address your.Float.ing.IP

netmask 32
IPv6:
auto eth0:1

iface eth0:1 inet6 static

address one IPv6 address of the subnet, e.g. 2a01:4f9:0:2a1::2

netmask 64
- Now you should restart your network. Caution: This will reset your network connection:
sudo service networking restart
Ubuntu 20.04:
- Access the server via SSH.
- Create the configuration file and open an editor:
touch /etc/netplan/60-floating-ip.yaml

nano /etc/netplan/60-floating-ip.yaml - Paste the following configuration into the editor and replace your.Float.ing.IP with your floating IP: IPv4:
network:

version: 2

ethernets:

eth0:

addresses:

- your.float.ing.ip/32
IPv6:
network:

version: 2

ethernets:

eth0:

addresses:

- your.float.ing.ip/64
- Now you should restart your network. Caution: This will reset your network connection:
sudo netplan apply
On RHEL based distributions (Fedora, CentOS):
- Access the server via SSH.
- Create the configuration file and open an editor:
touch /etc/sysconfig/network-scripts/ifcfg-eth0:1

vi /etc/sysconfig/network-scripts/ifcfg-eth0:1 - Paste the following configuration into the editor and replace your.Float.ing.IP with your floating IP:
IPv4:
BOOTPROTO=static

DEVICE=eth0:1

IPADDR=your.Float.ing.IP

PREFIX=32

TYPE=Ethernet

USERCTL=no

ONBOOT=yes
IPv6:
BOOTPROTO=none

DEVICE=eth0:1

ONBOOT=yes

IPV6ADDR=one IPv6 address of the subnet, e.g. 2a01:4f9:0:2a1::2/64

IPV6INIT=yes
- Now you should restart your network. Caution: This will reset your network connection:
systemctl restart network
How to view my primary IP address?
To view primary IP address:
1- Login to Client Portal
2- Navigate to my services, in this case it is your VPS server.
3- Click manage services located at bottom right:

4- Scroll down to server quick actions and click Networking:
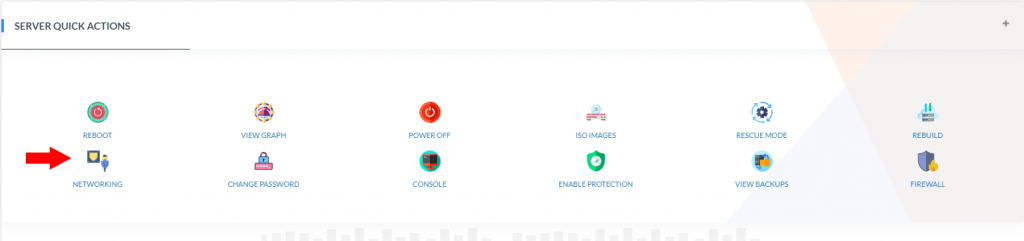
5- A message will appear – click confirm
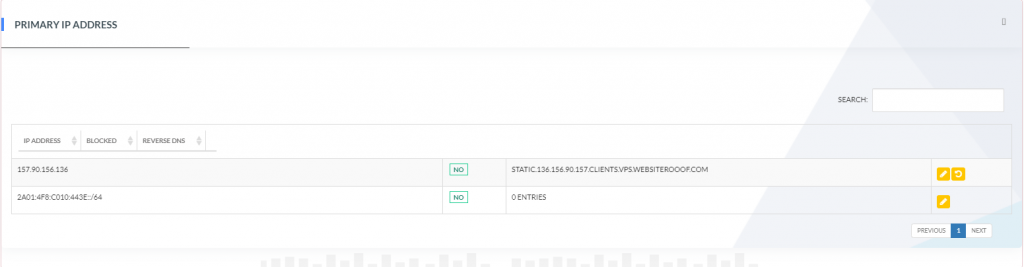
6- You can now view your primary IP address in a table showing:
- IPv4 address
- IPv6 address
- Blocked State
- Reverse DNS value
How to view my floating IP address?
To view floating IP address:
1- Login to Client Portal
2- Navigate to my services, in this case it is your VPS server.
3- Click manage services located at bottom right:
4- Scroll down to server quick actions and click Networking:
5- A message will appear – click confirm
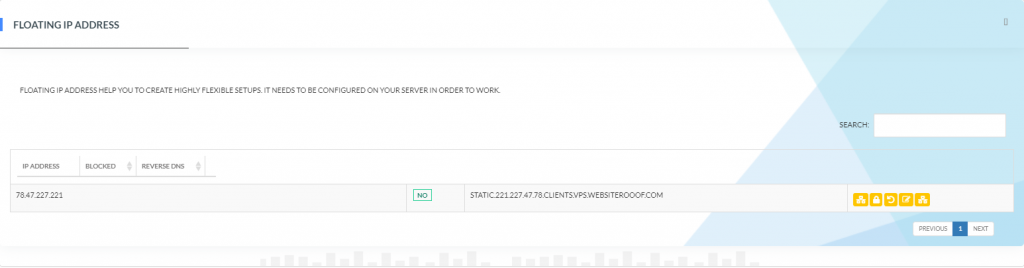
6- You can now view your floating IP address in a table below primary IP address showing:
- IPv4 address
- Blocked State
- Reverse DNS value
How to change primary IPv4 reverse PTR?
While inside networking – Primary IP address:
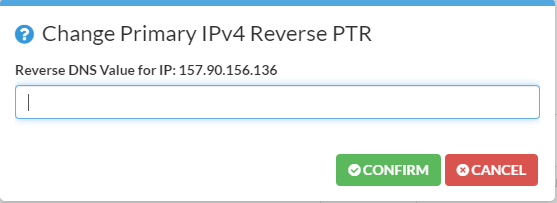
1- Click the edit reverse DNS button located right in primary IP address table:

2- A message will appear enter value and click confirm when you are done.
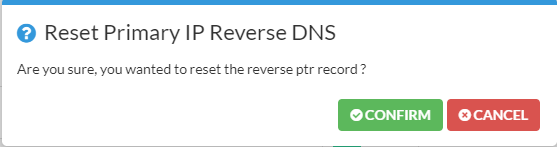
How to reset primary IPv4 reverse PTR?
While inside networking – Primary IP address:
1- Click the reset reverse DNS button located right in primary IP address table:
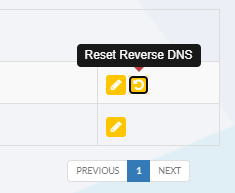
2- A message will appear – click confirm when you are done.
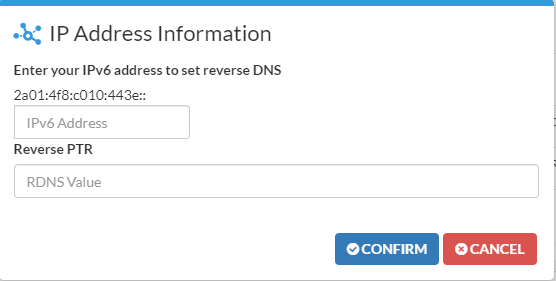
How to set primary IPv6 reverse PTR?
While inside Networking – Primary IP address:
1- Click the set reverse DNS button that corresponds to your IPv6 located right in primary IP address table:

2- A message will appear, enter your IPv6 address then enter RDNS value (reverse PTR) click confirm when you are done.
How to configure floating IP?
While inside networking – floating IP address:
1- Click the show instructions button located right in floating IP address table:
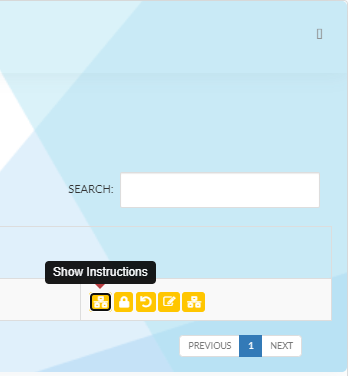
2- A message will appear showing the command line for temporary configuration, copy command line and enter in console.

3- reboot server
How to enable floating IP protection?
While inside networking – floating IP address:
1- Click the enable protection button located right in floating IP address table:
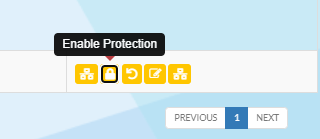
2- A message will appear – click confirm.
How to reset floating IP rDNS?
While inside networking – floating IP address:
1- Click the reset reverse DNS button located right in floating IP address table:
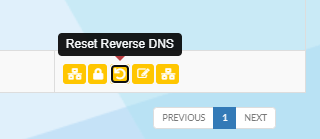
2- A message will appear – click confirm.
How to change floating IP name/description?
While inside networking – floating IP address:
1- Click the change IP description button located right in floating IP address table:
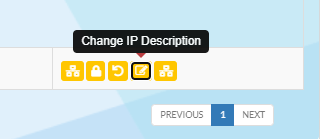
2- A message will appear, enter name – click confirm.
How to change floating IP reverse PTR?
While inside networking – floating IP address:
1- Click the change reverse PTR button located right in floating IP address table:
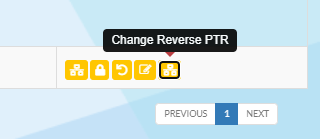
2- A message will appear, enter value – click confirm.
What is a valid rDNS entry for mail servers?
You need to be able to resolve a reverse DNS entry in both directions. This means that the domain that is assigned to an IP address must resolve to the same IP.
Static IP configuration
Debian / Ubuntu
ifup
Edit /etc/network/interfaces:
auto eth0

iface eth0 inet static

address <your IPv4 address>

netmask 255.255.255.255

gateway 172.31.1.1

pointopoint 172.31.1.1

dns-nameservers 213.133.98.98 213.133.99.99 213.133.100.100

iface eth0 inet6 static

address <one IPv6 address from your subnet, e.g. 2001:db8:0:3df1::1>

netmask 64

gateway fe80::1
Execute the following command
rm /etc/network/interfaces.d/50-cloud-init.cfgnetplan
Edit /etc/netplan/50-cloud-init.yaml
network:

version: 2

renderer: networkd

ethernets:

eth0:

addresses:

- <your IPv4 address>/32

- <one IPv6 address from your subnet, e.g. 2001:db8:0:3df1::1>/64

routes:

- to: 0.0.0.0/0

via: 172.31.1.1

on-link: true

gateway6: fe80::1

match:

macaddress: YOUR:MAC:ADDRESS

set-name: eth0
Disable cloud-init network changes
Add file /etc/cloud/cloud.cfg.d/99-disable-network-config.cfg:
network:

config: disabled
Fedora / CentOS
Edit /etc/cloud/cloud.cfg.d/98-disable-network.cfg:
network:

config: disabled
Edit /etc/sysconfig/network-scripts/ifcfg-eth0:
BOOTPROTO=static

DEVICE=eth0

HWADDR=<keep the HWADDR as is!!>

ONBOOT=yes

TYPE=Ethernet

USERCTL=no

IPADDR=<your IPv4 address>

NETMASK=255.255.255.255

DNS1=213.133.98.98

DNS2=213.133.99.99

IPV6ADDR=<one IPv6 address from your subnet, e.g. 2001:db8:0:3df1::1>/64

IPV6INIT=yes

IPV6_DEFAULTGW=fe80::1%eth0

IPV6_DEFAULTDEV=eth0
Edit /etc/sysconfig/network-scripts/route-eth0:
172.31.1.1/32 dev eth0

default via 172.31.1.1 dev eth0
FreeBSD
Edit /etc/rc.conf
ifconfig_vtnet0="DHCP"

ifconfig_vtnet0_ipv6="inet6 <one IPv6 address from your subnet, e.g. 2001:db8:0:3df1::1>/64"

ipv6_defaultrouter="fe80::1%vtnet0"